Springboot 中使用 Gson 与 Fastjson 替换默认 Json 组件 Jackson
文章目录
!版权声明:本博客内容均为原创,每篇博文作为知识积累,写博不易,转载请注明出处。
系统环境:
- Java JDK 版本:1.8
- SpringBoot 版本:2.2.6.RELEASE
示例项目地址:
一、简介
在 Java 开发日常中,我们经常会写接口,尤其微服务流行的今天,各个服务都是通过接口相互调用配合,而接口实现的大部分都是基于 Http 协议,且使用 Json 数据格式,而在 Java 中最常用的就是 Jackson、Fastjson、Gson 三种 Json 解析器,它们各自有各自的特性,解析效率和稳定性都不相同,在开发中我们会经常会切换着用。
SpringBoot 是现在非常流行的开源框架,也是我们在日常开发中经使用的框架,它默认的 Json 解析器是基于 Jackson 的,有时候我们需要将这个默认 Json 解析器替换为 FastJson 或者 Gson,替换起来也很简单,只需要移除 Jackson 的配置,然后自定义一个 HttpMessageConverters 就可以完成该项操作。
二、将 SpringBoot 默认 Json 组件替换为 FastJson
示例项目 Github 地址是:SpringBoot 中使用 Gson 替换默认 Json 组件 Jackson 示例,随手点个星哈 ^^~
1、Maven 引入 FastJson 依赖
Maven 中引入 SpringBoot 和 Fastjson 依赖:
 1<?xml version="1.0" encoding="UTF-8"?>
 2<project xmlns="http://maven.apache.org/POM/4.0.0" xmlns:xsi="http://www.w3.org/2001/XMLSchema-instance"
 3         xsi:schemaLocation="http://maven.apache.org/POM/4.0.0 http://maven.apache.org/xsd/maven-4.0.0.xsd">
 4    <modelVersion>4.0.0</modelVersion>
 5
 6    <parent>
 7        <groupId>org.springframework.boot</groupId>
 8        <artifactId>spring-boot-starter-parent</artifactId>
 9        <version>2.2.6.RELEASE</version>
10    </parent>
11
12    <groupId>club.mydlq</groupId>
13    <artifactId>springboot-fastjson-example</artifactId>
14    <version>0.0.1</version>
15    <name>springboot-fastjson-example</name>
16    <description>springboot fastjson example</description>
17
18    <properties>
19        <java.version>1.8</java.version>
20    </properties>
21
22    <dependencies>
23        <!-- SpringBoot Web -->
24        <dependency>
25            <groupId>org.springframework.boot</groupId>
26            <artifactId>spring-boot-starter-web</artifactId>
27        </dependency>
28        <!-- Fastjson -->
29       <dependency>
30		    <groupId>com.alibaba</groupId>
31		    <artifactId>fastjson</artifactId>
32		    <version>1.2.68</version>
33		</dependency>
34    </dependencies>
35
36    <build>
37        <plugins>
38            <plugin>
39                <groupId>org.springframework.boot</groupId>
40                <artifactId>spring-boot-maven-plugin</artifactId>
41            </plugin>
42        </plugins>
43    </build>
44
45</project>
2、自定义 Http 消息转换对象 Bean
自定义 Http 消息转换对象 Bean,引入 Fastjson 对象并配置,代码如下:
 1import com.alibaba.fastjson.support.config.FastJsonConfig;
 2import com.alibaba.fastjson.support.spring.FastJsonHttpMessageConverter;
 3import org.springframework.boot.autoconfigure.http.HttpMessageConverters;
 4import org.springframework.context.annotation.Bean;
 5import org.springframework.context.annotation.Configuration;
 6import org.springframework.http.MediaType;
 7import org.springframework.http.converter.HttpMessageConverter;
 8import java.util.ArrayList;
 9import java.util.Collection;
10import java.util.List;
11
12@Configuration
13public class JsonConfig {
14
15    /**
16     * 配置 HttpMessageConverters 来使用 Gson 实现 JSON 转换
17     */
18    @Bean
19    public HttpMessageConverters customConverters() {
20        // 创建 convert 消息转换对象
21        Collection<HttpMessageConverter<?>> messageConverters = new ArrayList<>();
22        FastJsonHttpMessageConverter fastConverter = new FastJsonHttpMessageConverter();
23        // 创建与配置 Fastjson 对象
24        FastJsonConfig fastJsonConfig = new FastJsonConfig();
25        fastJsonConfig.setDateFormat("yyyy-MM-dd HH:mm:ss");
26        fastConverter.setFastJsonConfig(fastJsonConfig);
27        // 解决中文乱码
28        List<MediaType> fastMediaTypes = new ArrayList<>();
29        fastMediaTypes.add(MediaType.APPLICATION_JSON);
30        fastConverter.setSupportedMediaTypes(fastMediaTypes);
31        // 将convert 添加到 converters
32        messageConverters.add(fastConverter);
33        return new HttpMessageConverters(true, messageConverters);
34    }
35
36}
3、启动类中注解中移除 Jackson 配置
在启动类的 @SpringBootApplication 注解中,添加 exclude = {JacksonAutoConfiguration.class} 配置来移除默认的 Jackson 配置。
 1import org.springframework.boot.SpringApplication;
 2import org.springframework.boot.autoconfigure.SpringBootApplication;
 3import org.springframework.boot.autoconfigure.jackson.JacksonAutoConfiguration;
 4
 5@SpringBootApplication(exclude = {JacksonAutoConfiguration.class})
 6public class Application {
 7
 8    public static void main(String[] args) {
 9        SpringApplication.run(Application.class, args);
10    }
11
12}
三、将 SpringBoot 默认 Json 组件替换为 Gson
示例项目 Github 地址是:SpringBoot 中使用 Gson 替换默认 Json 组件 Jackson 示例,随手点个星哈 ^^~
1、Maven 引入 Gson 依赖
Maven 中引入 SpringBoot 和 Gson 依赖:
 1<?xml version="1.0" encoding="UTF-8"?>
 2<project xmlns="http://maven.apache.org/POM/4.0.0" xmlns:xsi="http://www.w3.org/2001/XMLSchema-instance"
 3         xsi:schemaLocation="http://maven.apache.org/POM/4.0.0 http://maven.apache.org/xsd/maven-4.0.0.xsd">
 4    <modelVersion>4.0.0</modelVersion>
 5
 6    <parent>
 7        <groupId>org.springframework.boot</groupId>
 8        <artifactId>spring-boot-starter-parent</artifactId>
 9        <version>2.2.6.RELEASE</version>
10    </parent>
11
12    <groupId>club.mydlq</groupId>
13    <artifactId>springboot-gson-example</artifactId>
14    <version>0.0.1</version>
15    <name>springboot-gson-example</name>
16    <description>springboot gson example</description>
17
18    <properties>
19        <java.version>1.8</java.version>
20    </properties>
21
22    <dependencies>
23        <!-- SpringBoot Web -->
24        <dependency>
25            <groupId>org.springframework.boot</groupId>
26            <artifactId>spring-boot-starter-web</artifactId>
27        </dependency>
28        <!-- Gson -->
29        <dependency>
30            <groupId>com.google.code.gson</groupId>
31            <artifactId>gson</artifactId>
32        </dependency>
33    </dependencies>
34
35    <build>
36        <plugins>
37            <plugin>
38                <groupId>org.springframework.boot</groupId>
39                <artifactId>spring-boot-maven-plugin</artifactId>
40            </plugin>
41        </plugins>
42    </build>
43
44</project>
2、自定义 SpringBoot 中的 HttpMessageConverters 对象
自定义 Http 消息转换对象 Bean,引入 Gson 对象并配置,代码如下:
 1import com.google.gson.*;
 2import org.springframework.boot.autoconfigure.http.HttpMessageConverters;
 3import org.springframework.context.annotation.Bean;
 4import org.springframework.context.annotation.Configuration;
 5import org.springframework.http.converter.HttpMessageConverter;
 6import org.springframework.http.converter.json.GsonHttpMessageConverter;
 7import java.util.ArrayList;
 8import java.util.Collection;
 9
10@Configuration
11public class JsonConfig {
12
13    @Bean
14    public HttpMessageConverters customConverters() {
15        // 创建 convert 消息转换对象
16        Collection<HttpMessageConverter<?>> messageConverters = new ArrayList<>();
17        GsonHttpMessageConverter gsonHttpMessageConverter = new GsonHttpMessageConverter();
18        // 创建与配置 Gson 对象
19        Gson gson = new GsonBuilder()
20                .setDateFormat("yyyy-MM-dd HH:mm:ss")
21                .excludeFieldsWithoutExposeAnnotation()
22                .disableHtmlEscaping()
23                .create();
24        gsonHttpMessageConverter.setGson(gson);
25        // 将convert 添加到 converters
26        messageConverters.add(gsonHttpMessageConverter);
27        return new HttpMessageConverters(true, messageConverters);
28    }
29
30}
3、配置启动类并设置移除 Jackson 配置
 1import org.springframework.boot.SpringApplication;
 2import org.springframework.boot.autoconfigure.SpringBootApplication;
 3import org.springframework.boot.autoconfigure.jackson.JacksonAutoConfiguration;
 4
 5@SpringBootApplication(exclude = {JacksonAutoConfiguration.class})
 6public class Application {
 7
 8    public static void main(String[] args) {
 9        SpringApplication.run(Application.class, args);
10    }
11
12}
四、解决引入 Swagger 组件无法使用问题
本人在测试中集成了 Swagger2 依赖,Swagger2 默认使用 Jackson,如果将 Json 解析器替换后 Swagger2 和 Swagger-ui 将不能正常进行 Json 转换。这个问题在 Fastjson 新版本中已经添加适配器进行解决,而 Gson 则需要按下面自定义其 Json 转换适配器,才能够使 Swgger2 正常使用。
1、Maven 中引入 Swagger 依赖发现问题
在引入 Gson 时如果也同时引入 Swagger 依赖:
 1<dependency>
 2    <groupId>io.springfox</groupId>
 3    <artifactId>springfox-swagger2</artifactId>
 4    <version>2.9.2</version>
 5</dependency>
 6<dependency>
 7    <groupId>io.springfox</groupId>
 8    <artifactId>springfox-swagger-ui</artifactId>
 9    <version>2.9.2</version>
10</dependency>
引入后会发现 Swagger 界面无法正常打开:
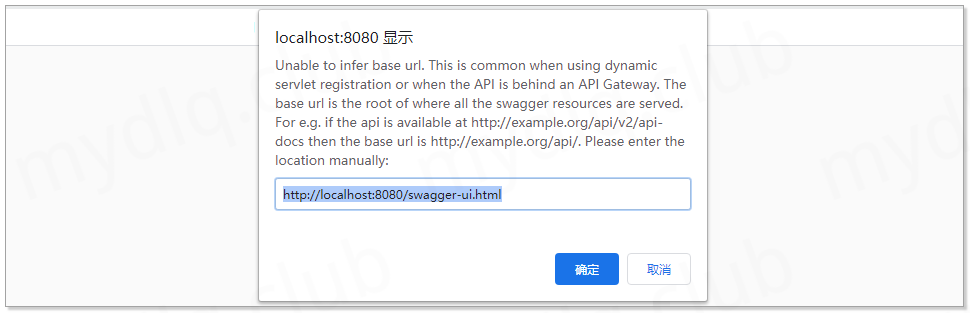
2、引入 Swagger 后无法正常使用的问题分析并解决
分析上面 Swagger 无法打开原因,经过查找相关资料和进行测试,其原因是 Gosn 中也开启了 excludeFieldsWithoutExposeAnnotation() 选项,而该选项的作用是只将实体类中添加 Gson 的 @Expose() 注解的变量进行 Json 序列化,而不添加该注解的变量则默认不进行 Json 序列化,而 Swagger 默认是基于 Jackson 的,接口实体类肯定是不会带上 Gson 的注解的,所以在将 Json 解析器替换为 Gson 且开启 excludeFieldsWithoutExposeAnnotation() 后,Swagger 的实体类中的属性都不会进行序列化。
不过在 Gson 中提供了适配器配置,使用其可以帮助我们解决这个问题,具体可以按下面操作,修改上面的 Json 配置类,在 Gosn 配置中配置几个 Swagger 配器,操作如下:
  1import com.google.gson.*;
  2import org.springframework.boot.autoconfigure.http.HttpMessageConverters;
  3import org.springframework.context.annotation.Bean;
  4import org.springframework.context.annotation.Configuration;
  5import org.springframework.http.converter.HttpMessageConverter;
  6import org.springframework.http.converter.json.GsonHttpMessageConverter;
  7import springfox.documentation.service.ApiListing;
  8import springfox.documentation.service.ResourceListing;
  9import springfox.documentation.spring.web.json.Json;
 10import springfox.documentation.swagger.web.SecurityConfiguration;
 11import springfox.documentation.swagger.web.SwaggerResource;
 12import springfox.documentation.swagger.web.UiConfiguration;
 13import java.lang.reflect.Type;
 14import java.util.ArrayList;
 15import java.util.Collection;
 16
 17@Configuration
 18public class JsonConfig {
 19
 20    /**
 21     * 配置 HttpMessageConverters 来使用 Gson 实现 JSON 转换
 22     */
 23    @Bean
 24    public HttpMessageConverters customConverters() {
 25        // 创建 convert 消息转换对象
 26        Collection<HttpMessageConverter<?>> messageConverters = new ArrayList<>();
 27        GsonHttpMessageConverter gsonHttpMessageConverter = new GsonHttpMessageConverter();
 28        // 创建与配置 Gson 对象
 29        Gson gson = new GsonBuilder()
 30                .setDateFormat("yyyy-MM-dd HH:mm:ss")
 31                .excludeFieldsWithoutExposeAnnotation()
 32                .disableHtmlEscaping()
 33                // 使用 Gson 通过的适配器来适配 Swagger
 34                .registerTypeAdapter(Json.class, SwaggerJsonSerializer.INSTANCE)
 35                .registerTypeAdapter(ApiListing.class, SwaggerApiListingJsonSerializer.INSTANCE)
 36                .registerTypeAdapter(SwaggerResource.class, SwaggerResourceSerializer.INSTANCE)
 37                .registerTypeAdapter(ResourceListing.class, SwaggerResourceListingJsonSerializer.INSTANCE)
 38                .registerTypeAdapter(SwaggerResource.class, SwaggerResourceSerializer.INSTANCE)
 39                .registerTypeAdapter(SecurityConfiguration.class, SwaggerSecurityConfigurationSerializer.INSTANCE)
 40                .registerTypeAdapter(UiConfiguration.class, SwaggerUiConfigurationSerializer.INSTANCE)
 41                .create();
 42        gsonHttpMessageConverter.setGson(gson);
 43        // 将convert 添加到 converters
 44        messageConverters.add(gsonHttpMessageConverter);
 45        return new HttpMessageConverters(true, messageConverters);
 46    }
 47
 48    static class SwaggerJsonSerializer implements JsonSerializer<Json> {
 49        public final static SwaggerJsonSerializer INSTANCE = new SwaggerJsonSerializer();
 50
 51        @Override
 52        public JsonElement serialize(Json src, Type typeOfSrc, JsonSerializationContext context) {
 53            return JsonParser.parseString(src.value());
 54        }
 55    }
 56
 57    static class SwaggerApiListingJsonSerializer implements JsonSerializer<ApiListing> {
 58        public final static SwaggerApiListingJsonSerializer INSTANCE = new SwaggerApiListingJsonSerializer();
 59
 60        @Override
 61        public JsonElement serialize(ApiListing src, Type typeOfSrc, JsonSerializationContext context) {
 62            return new Gson().toJsonTree(src, typeOfSrc);
 63        }
 64    }
 65
 66    static class SwaggerResourceSerializer implements JsonSerializer<SwaggerResource> {
 67        public final static SwaggerResourceSerializer INSTANCE = new SwaggerResourceSerializer();
 68
 69        @Override
 70        public JsonElement serialize(SwaggerResource src, Type typeOfSrc, JsonSerializationContext context) {
 71            return new Gson().toJsonTree(src, typeOfSrc);
 72        }
 73    }
 74
 75    static class SwaggerResourceListingJsonSerializer implements JsonSerializer<ResourceListing> {
 76        public final static SwaggerResourceListingJsonSerializer INSTANCE = new SwaggerResourceListingJsonSerializer();
 77
 78        @Override
 79        public JsonElement serialize(ResourceListing src, Type typeOfSrc, JsonSerializationContext context) {
 80            return new Gson().toJsonTree(src, typeOfSrc);
 81        }
 82    }
 83
 84    static class SwaggerSecurityConfigurationSerializer implements JsonSerializer<SecurityConfiguration> {
 85        public final static SwaggerSecurityConfigurationSerializer INSTANCE = new SwaggerSecurityConfigurationSerializer();
 86
 87        @Override
 88        public JsonElement serialize(SecurityConfiguration src, Type typeOfSrc, JsonSerializationContext context) {
 89            return new Gson().toJsonTree(src, typeOfSrc);
 90        }
 91    }
 92
 93    static class SwaggerUiConfigurationSerializer implements JsonSerializer<UiConfiguration> {
 94        public final static SwaggerUiConfigurationSerializer INSTANCE = new SwaggerUiConfigurationSerializer();
 95
 96        @Override
 97        public JsonElement serialize(UiConfiguration src, Type typeOfSrc, JsonSerializationContext context) {
 98            return new Gson().toJsonTree(src, typeOfSrc);
 99        }
100    }
101
102}
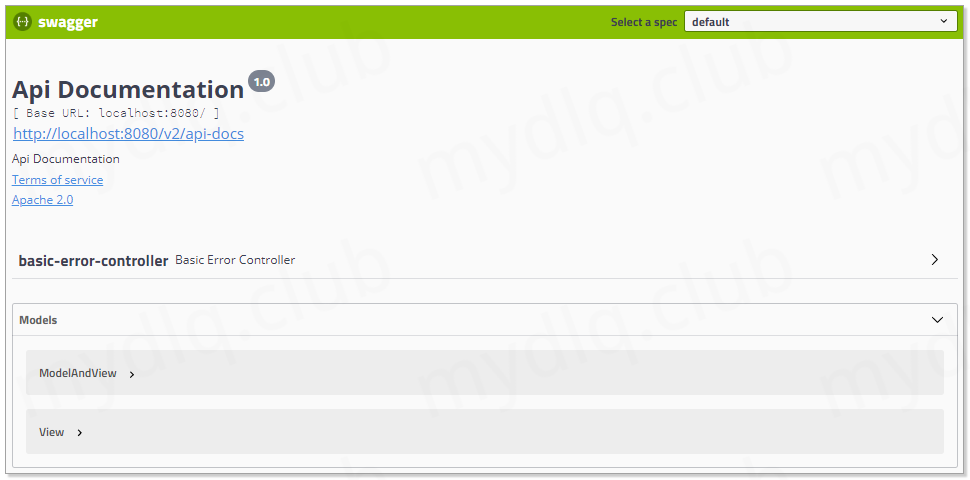
然后在浏览器中再次访问 Swagger-ui 地址 http://localhost:8080/swagger-ui.html 可以看到已经能够正常访问 Swagger-ui 界面:
---END---

!版权声明:本博客内容均为原创,每篇博文作为知识积累,写博不易,转载请注明出处。