Jenkins Email 邮件配置
文章目录
!版权声明:本博客内容均为原创,每篇博文作为知识积累,写博不易,转载请注明出处。
环境介绍:
- Jenkins: 2.172
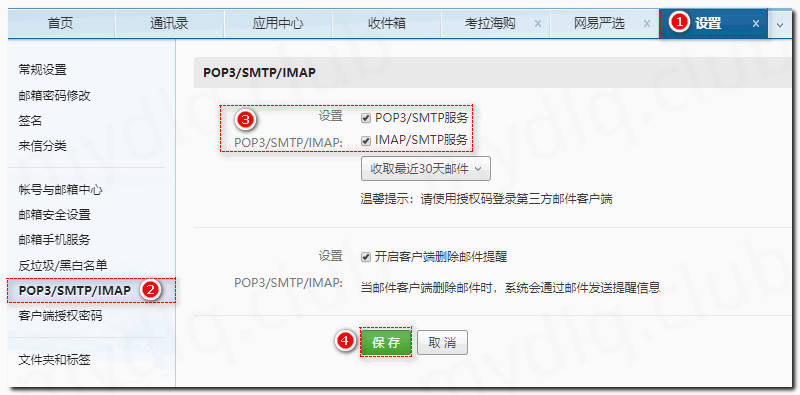
一、设置邮箱开启 POP3/SMTP/IMAP 设置
这里用的是 163 邮箱

二、安装 Email Extension Template 插件
系统管理->插件管理:
这里安装插件“Email Extension Template”用于设置邮件模板。

三、配置系统默认邮件参数
系统管理->系统设置:
配置“Jenkins Location”和“Extended E-mail Notification”,其中系统管理员邮件地址一定要和“User Name”值一致。
1、Jenkins Location 设置
设置参数:
- Jenkins URL: Jenkins 地址,用于发送邮件时写入内容之中
- 系统管理员邮件地址: 邮件服务器账户

2、Extended E-mail Notification 设置
设置参数:
- SMTP server: smtp 邮箱服务的地址
- Default user E-mail suffix: 邮件服务器后缀
- User Name: 邮件服务器账户
- Password: 邮件服务器 SMTP 授权码
- Default Content Type: 设置邮件文本格式
- Enable Debug Mode: 启用 Debug 模式

四、测试发送邮件
1、创建流水线项目
创建一个流水线项目,用于写 Pipeline 脚本测试邮件发送。

2、配置 Pipeline 脚本
这里写一个简单的 Pipeline 脚本,调用 emailext 方法执行发送邮件。
参考:https://jenkins.io/doc/pipeline/steps/email-ext/

脚本内容:
1node () {
2    stage('email'){
3        echo "测试发送邮件"
4        emailext(subject: '任务执行失败',to: '324******47@qq.com',body: '''测试邮件内容...''')
5    }
6}
3、运行项目查看日志
查看日志,看是否执行发送操作以及运行状况。
 1Started by user admin
 2Running in Durability level: PERFORMANCE_OPTIMIZED
 3[Pipeline] Start of Pipeline
 4[Pipeline] node
 5Running on Jenkins in /var/jenkins_home/workspace/email-test
 6[Pipeline] {
 7[Pipeline] stage
 8[Pipeline] { (email)
 9[Pipeline] echo
10测试发送邮件
11[Pipeline] emailext
12Sending email to: 32*****47@qq.com
13[Pipeline] }
14[Pipeline] // stage
15[Pipeline] }
16[Pipeline] // node
17[Pipeline] End of Pipeline
18Finished: SUCCESS
4、查看邮件
查看邮件,可以看到已经收到设置邮箱发来的邮件信息。

五、配置邮件模板
在之前安装 Jenkins 时选择安装了 “Config File Provider”、“Pipeline Utility Steps”两个插件。
- Config File Provider: 提供文件的存储插件。
- Pipeline Utility Steps: 提供文件的读写的插件。
1、添加模板文件
系统管理->Managed files->Add a new Config
选择“Extended Email Publisher Groovy Template”类型,然后添加邮件模板。


模板内容如下:
1<!DOCTYPE html>
2<html>
3<head>
4<meta charset="UTF-8">
5<title>${ENV, var="JOB_NAME"}-第${BUILD_NUMBER}次构建日志</title>
6</head>
7
8<body leftmargin="8" marginwidth="0" topmargin="8" marginheight="4"
9 offset="0">
10 <table width="95%" cellpadding="0" cellspacing="0" style="font-size: 11pt; font-family: Tahoma, Arial, Helvetica, sans-serif">
11 <tr>
12 <td>各位同事,大家好,以下为${PROJECT_NAME }项目构建信息</td>
13 </tr>
14 <tr>
15 <td><br />
16 <b><font color="#0B610B">构建信息</font></b>
17 <hr size="2" width="100%" align="center" /></td>
18 </tr>
19 <tr>
20 <td>
21 <ul>
22 <li>项目名称 : ${PROJECT_NAME}</li>
23 <li>构建编号 : 第${BUILD_NUMBER}次构建</li>
24 <li>触发原因: ${CAUSE}</li>
25 <li>构建状态: ${BUILD_STATUS}</li>
26 <li>构建日志: <a href="${BUILD_URL}console">${BUILD_URL}console</a></li>
27 <li>构建 Url : <a href="${BUILD_URL}">${BUILD_URL}</a></li>
28 <li>工作目录 : <a href="${PROJECT_URL}ws">${PROJECT_URL}ws</a></li>
29 <li>项目 Url : <a href="${PROJECT_URL}">${PROJECT_URL}</a></li>
30 </ul>
31 </td>
32 </tr>
33 <tr>
34 <td><b><font color="#0B610B">历史变更记录:</font></b>
35 <hr size="2" width="100%" align="center" /></td>
36 </tr>
37 <tr>
38 <td>
39 ${CHANGES_SINCE_LAST_SUCCESS,reverse=true, format="Changes for Build #%n:<br />%c<br />",showPaths=true,changesFormat="<pre>[%a]<br />%m</pre>",pathFormat=" %p"}
40 </td>
41 </tr>
42 </table>
43</body>
44</html>
2、测试发送模板邮件
修改上面测试的 Pipeline 项目,替换脚本:

脚本内容:
 1node () {
 2    stage('email'){
 3        echo "测试发送邮件"
 4        // 设置生成模板文件
 5        configFileProvider([configFile(fileId: '0ad43176-c202-4ebc-aaff-441ef79f49d8',
 6                                       targetLocation: 'email.html',
 7                                       variable: 'failt_email_template')]) {
 8            //  读取模板
 9            template = readFile encoding: 'UTF-8', file: "${failt_email_template}"
10            //  发送邮件
11            emailext(subject: '任务执行失败',
12            	     attachLog: true,
13            	     recipientProviders: [requestor()],
14            	     to: '32*****47@qq.com',
15            	     body: """${template}""")
16        }
17    }
18}
- body: 邮件内容
- subject: 邮件主题
- to: 指定邮件接收者
- attachLog: 附加构建日志信息到附件中
- recipientProviders: 设置邮件接收者,可以设置向任务请求触发人员、项目组、整个团体等发生邮件,这样既可以发生邮件到 to 中的设置人员,也可以发生给对应触发人员。
3、运行项目查看日志
 1Started by user admin
 2Running in Durability level: PERFORMANCE_OPTIMIZED
 3[Pipeline] Start of Pipeline (hide)
 4[Pipeline] node
 5Running on Jenkins in /var/jenkins_home/workspace/email-test
 6[Pipeline] {
 7[Pipeline] stage
 8[Pipeline] { (email)
 9[Pipeline] echo
10测试发送邮件
11[Pipeline] configFileProvider
12provisioning config files...
13copy managed file [Fail  Email Template] to file:/var/jenkins_home/workspace/email-test/aa.html
14[Pipeline] {
15[Pipeline] readFile
16[Pipeline] emailext
17Sending email to: 32******47@qq.com
18[Pipeline] }
19[Pipeline] // configFileProvider
20[Pipeline] }
21[Pipeline] // stage
22[Pipeline] }
23[Pipeline] // node
24[Pipeline] End of Pipeline
25Finished: SUCCESS
4、查看邮件
可以看到构建内容如下:


!版权声明:本博客内容均为原创,每篇博文作为知识积累,写博不易,转载请注明出处。