SpringBoot 使用 Springfox Swagger 3.0 调试接口
文章目录
!版权声明:本博客内容均为原创,每篇博文作为知识积累,写博不易,转载请注明出处。
系统环境:
- SpingBoot版本: 2.4.4
- Springfox 版本: 3.0.0
- JAVA JDK 版本: 1.8 (最低要求)
参考地址:
示例地址:
一、背景
由于 Spring Boot 能够快速开发、便捷部署等特性,相信有很大一部分 Spring Boot 的用户会用来构建 RESTful API。而我们构建 RESTful API 的目的通常都是由于多终端的原因,这些终端会共用很多底层业务逻辑,因此我们会抽象出这样一层来同时服务于多个移动端或者 Web 前端。
这样一来,我们的 RESTful API 就有可能要面对多个开发人员或多个开发团队:IOS 开发、Android 开发或是 Web 开发等。为了减少与其他团队平时开发期间的频繁沟通成本,传统做法我们会创建一份 RESTful API 文档来记录所有接口细节,然而这样的做法有以下几个问题:
- 由于接口众多,并且细节复杂(需要考虑不同的 HTTP 请求类型、HTTP 头部信息、HTTP 请求内容等),高质量地创建这份文档本身就是件非常吃力的事,下游的抱怨声不绝于耳。
- 随着时间推移,不断修改接口实现的时候都必须同步修改接口文档,而文档与代码又处于两个不同的媒介,除非有严格的管理机制,不然很容易导致不一致现象。
为了解决上面这样的问题,本文将介绍 RESTful API 的重磅好伙伴 Springfox,它可以轻松的整合到 SpringBoot 中,并与 Spring MVC 程序配合组织出强大 RESTful API文档。它既可以减少我们创建文档的工作量,同时说明内容又整合入实现代码中,让维护文档和修改代码整合为一体,可以让我们在修改代码逻辑的同时方便的修改文档说明。另外 Springfox Swagger 也提供了强大的页面测试功能来调试每个 RESTful API。
二、Swagger简介
Swagger 既是一款接口的文档在线自动生成软件,也是一个规范和完整的框架,用于生成、描述、调用和可视化 RESTful 风格的 Web 服务。总体目标是使客户端和文件系统作为服务器以同样的速度来更新。文件的方法、参数和模型紧密集成到服务器端的代码,允许 API 来始终保持同步。Swagger 让部署管理和使用功能强大的 API 从未如此简单。
三、创建示例项目
Maven 引入 Springfox 依赖
新建 Maven 项目,往其 pom.xml 中引入 Springboot 及 Springfox Swagger 相关依赖。
 1<?xml version="1.0" encoding="UTF-8"?>
 2<project xmlns="http://maven.apache.org/POM/4.0.0" xmlns:xsi="http://www.w3.org/2001/XMLSchema-instance"
 3         xsi:schemaLocation="http://maven.apache.org/POM/4.0.0 http://maven.apache.org/xsd/maven-4.0.0.xsd">
 4    <modelVersion>4.0.0</modelVersion>
 5
 6    <groupId>club.mydlq</groupId>
 7    <artifactId>springboot-swagger-v3-example</artifactId>
 8    <version>1.0.0</version>
 9    <name>springboot-swagger-v3-example</name>
10    <description>springboot swagger v3 api example service</description>
11
12    <properties>
13        <java.version>1.8</java.version>
14    </properties>
15
16    <dependencies>
17        <dependency>
18            <groupId>org.springframework.boot</groupId>
19            <artifactId>spring-boot-starter-web</artifactId>
20            <version>2.4.4</version>
21        </dependency>
22        <dependency>
23            <groupId>org.projectlombok</groupId>
24            <artifactId>lombok</artifactId>
25            <version>1.18.18</version>
26            <scope>provided</scope>
27        </dependency>
28        <dependency>
29            <groupId>io.springfox</groupId>
30            <artifactId>springfox-boot-starter</artifactId>
31            <version>3.0.0</version>
32        </dependency>
33    </dependencies>
34
35    <build>
36        <plugins>
37            <plugin>
38                <groupId>org.springframework.boot</groupId>
39                <artifactId>spring-boot-maven-plugin</artifactId>
40            </plugin>
41        </plugins>
42    </build>
43
44</project>
注意: 由于 SpringBoot 2.6.x 后修改了路由匹配策略,所以需要在启动类或者配置类上加上
@EnableWebMvc,否则启动会报错!!!。
创建 Swagger 配置类
创建 Springfox Swagger 配置类,在该类中可以配置 Swagger 文档的基本信息,下面示例的配置类中本人已经对大部分常用参数标注了详细的说明。
 1import org.springframework.beans.factory.annotation.Value;
 2import org.springframework.context.annotation.Bean;
 3import org.springframework.context.annotation.Configuration;
 4import springfox.documentation.builders.ApiInfoBuilder;
 5import springfox.documentation.builders.PathSelectors;
 6import springfox.documentation.builders.RequestHandlerSelectors;
 7import springfox.documentation.oas.annotations.EnableOpenApi;
 8import springfox.documentation.service.ApiInfo;
 9import springfox.documentation.service.Contact;
10import springfox.documentation.spi.DocumentationType;
11import springfox.documentation.spring.web.plugins.Docket;
12
13@EnableOpenApi
14@Configuration
15public class SwaggerConfig {
16
17    @Value("${springfox.documentation.swagger-ui.enabled}")
18    private boolean enabled;
19
20    @Bean
21    public Docket createRestApi() {
22        return new Docket(
23                // 设置使用 OpenApi 3.0 规范
24                DocumentationType.OAS_30)
25                // 是否开启 Swagger
26                .enable(enabled)
27                // 配置项目基本信息
28                .apiInfo(apiInfo())
29                // 设置项目组名
30                //.groupName("xxx组")
31                // 选择那些路径和api会生成document
32                .select()
33                // 对所有api进行监控
34                .apis(RequestHandlerSelectors.any())
35                // 如果需要指定对某个包的接口进行监控,则可以配置如下
36                //.apis(RequestHandlerSelectors.basePackage("mydlq.swagger.example.controller"))
37                // 对所有路径进行监控
38                .paths(PathSelectors.any())
39                // 忽略以"/error"开头的路径,可以防止显示如404错误接口
40                .paths(PathSelectors.regex("/error.*").negate())
41                // 忽略以"/actuator"开头的路径
42                .paths(PathSelectors.regex("/actuator.*").negate())
43                .build();
44    }
45
46    private ApiInfo apiInfo() {
47        return new ApiInfoBuilder()
48                // 文档标题
49                .title("用户服务接口")
50                // 文档描述
51                .description("用户相关操作接口")
52                // 文档版本
53                .version("0.0.1")
54                // 设置许可声明信息
55                .license("Apache LICENSE 2.0")
56                // 设置许可证URL地址
57                .licenseUrl("https://github/my-dlq")
58                // 设置管理该API人员的联系信息
59                .contact(new Contact("超级小豆丁", "http://www.mydlq.club", "mynamedlq@163.com"))
60                .build();
61    }
62
63}
配置文件中添加参数
配置文件 application.yml 中添加 Springfox 的配置参数,现在 springfox-boot-starter 依赖包默认提供了参数 springfox.documentation.swagger-ui.enabled 来控制是否开启 Swagger 文档 UI,并且上面在 Swagger 配置文件中也引用这个参数作为 Swagger API 的开关,我们就能通过这一个参数来管理是否开启 Swagger 了,配置文件内容如下:
1spring:
2  application:
3    name: springboot-swagger-v3-example
4
5springfox:
6  documentation:
7    swagger-ui:
8      enabled: true
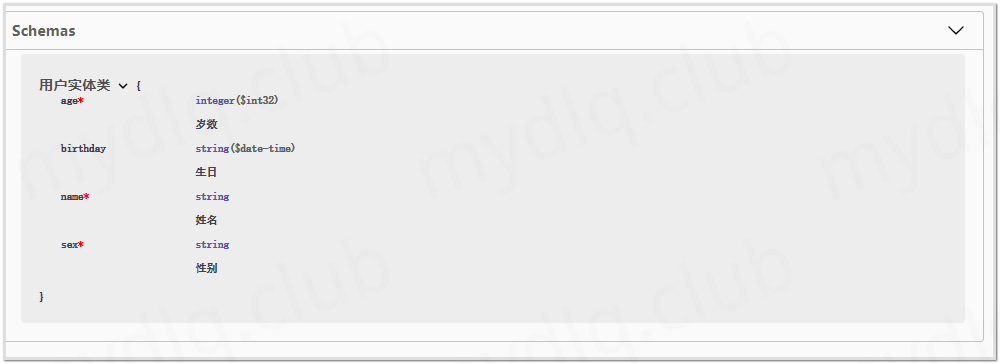
创建测试的 User 实体类
为了方便测试,这里创建一个 User 实体类,并且在类中使用了 Springfox Swagger 的 @ApiModel、@ApiModelProperty 两个注解,这些注解都是用于对实体类某个属性描述,方便后续在浏览 Swagger 文档中能知道具体参数的作用。
 1import io.swagger.annotations.ApiModelProperty;
 2import java.util.Date;
 3
 4@ApiModel("用户实体类")
 5@Data
 6@NoArgsConstructor
 7@AllArgsConstructor
 8public class User {
 9	// @ApiModelProperty:用于描述字段信息
10    @ApiModelProperty(value = "姓名", required = true)
11    private String name;
12    @ApiModelProperty(value = "性别", required = true)
13    private String sex;
14    @ApiModelProperty(value = "岁数", required = true)
15    private Integer age;
16    @ApiModelProperty(value = "生日")
17    private Date birthday;
18}
上面配置类中使用了
Lombok依赖的@Data、@NoArgsConstructor、@AllArgsConstructor三个注解,用于生成 get、set 以及无参和多参构造方法,能很方便的简化创建实体类的代码量。
创建示例 Controller 接口
创建一个示例的用户 Controller 类,且使用 Springfox Swagger 注解,对接口的作用进行详细描述。
1import io.swagger.annotations.*;
2import mydlq.swagger.example.model.User;
3import org.springframework.http.ResponseEntity;
4import org.springframework.web.bind.annotation.*;
5import java.time.LocalDateTime;
6
7@Api(tags = "用户接口")
8@RestController
9@RequestMapping("/users")
10public class UserController {
11
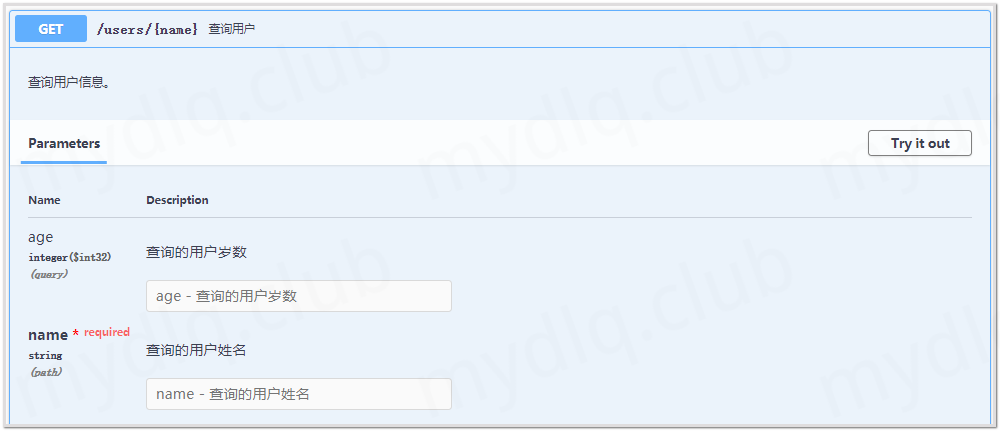
12 @ApiOperation(value = "查询用户", notes = "查询用户信息。")
13 @ApiImplicitParams({
14 @ApiImplicitParam(name = "name", value = "查询的用户姓名", required = true),
15 @ApiImplicitParam(name = "age", value = "查询的用户岁数", required = false)
16 })
17 @GetMapping(value = "/{name}")
18 public ResponseEntity<User> findUser(@PathVariable(value = "name", required = true) String name,
19 @RequestParam(value = "age", required = false) Integer age) {
20 // 创建模拟数据,然后返回数据
21 return ResponseEntity.ok(new User(name, "男", age, LocalDateTime.now()));
22 }
23
24 @PostMapping(value = "/")
25 @ApiOperation(value = "创建用户", notes = "创建新的用户信息。")
26 public ResponseEntity<String> addUser(@RequestBody User user) {
27 return ResponseEntity.ok(user.getName() + " created");
28 }
29
30 @PutMapping(value = "/")
31 @ApiOperation(value = "更新用户", notes = "更新用户信息。")
32 public ResponseEntity<User> modifyUser(@RequestBody User user) {
33 return ResponseEntity.ok(user);
34 }
35
36 @DeleteMapping(value = "/{name}")
37 @ApiOperation(value = "删除用户", notes = "删除用户信息。")
38 public ResponseEntity<String> deleteUser(@PathVariable(value = "name") String name) {
39 return ResponseEntity.ok(name + " deleted");
40 }
41
42}
上面类中使用了几个 Swagger 常用注解,分别为:
- @Api: 对整个 Controller 接口信息的描述。
- @ApiOperation: 对某个接口信息进行描述。
- @ApiImplicitParam: 对请求参数进行描述。
- @ApiImplicitParams: 用于包含多个 @ApiImplicitParam 注解,对请求中的多个参数进行描述。
以上注解为常用注解,更多可用的注解可以参考 Springfox 文档
创建 SpringBoot 启动类
创建启动类,用于启动 SpringBoot 应用。
 1import org.springframework.boot.SpringApplication;
 2import org.springframework.boot.autoconfigure.SpringBootApplication;
 3
 4@SpringBootApplication
 5public class Application {
 6
 7    public static void main(String[] args) {
 8        SpringApplication.run(Application.class, args);
 9    }
10
11}
四、访问示例项目
访问 Springfox Swagger API
这里要说的一点就是 Springfox Swagger 项目原理就是生成一个符合指定规范的 API 接口,能够从该接口获取内容信息,然后 Swagger-UI 前端项目会根据该 API 获取的 JSON 信息生成前端文档页面。
本地启动项目,然后输入地址 http://localhost:8080/v3/api-docs,可以看见 Swagger API 接口返回的 JSON 信息,该 JSON 内容符合 OpenAPI 3.0 规范。
 1{
 2    "openapi": "3.0.3",
 3    "info": {
 4        "title": "用户服务接口",
 5        "description": "用户相关操作接口",
 6        "contact": {
 7            "name": "超级小豆丁",
 8            "url": "http://www.mydlq.club",
 9            "email": "mynamedlq@163.com"
10        },
11        "license": {
12            "name": "Apache LICENSE 2.0",
13            "url": "https://github/my-dlq"
14        },
15        "version": "0.0.1"
16    },
17    "servers": [
18        {
19            "url": "http://localhost:8080",
20            "description": "Inferred Url"
21        }
22    ],
23    "tags": [
24        {
25            "name": "示例接口",
26            "description": "User Controller"
27        }
28    ],
29    "paths": {
30        "/users/": {
31            "put": {
32                "tags": [
33                    "示例接口"
34                ],
35                "summary": "更新用户",
36                "description": "更新用户信息。",
37                "operationId": "modifyUserUsingPUT",
38                "requestBody": {
39                    "content": {
40                        "application/json": {
41                            "schema": {
42                                "$ref": "#/components/schemas/用户实体类"
43                            }
44                        }
45                    }
46                }
47...(太长,略)
访问 Swagger UI 界面
在 Springfox 项目中,我们可也通过默认的 UI 地址 /swagger-ui/index.html 访问 Swagger 文档。这里本人是本地启动,所以输入地址 http://localhost:8080/swagger-ui/index.html 就能浏览 Swagger 文档页面。
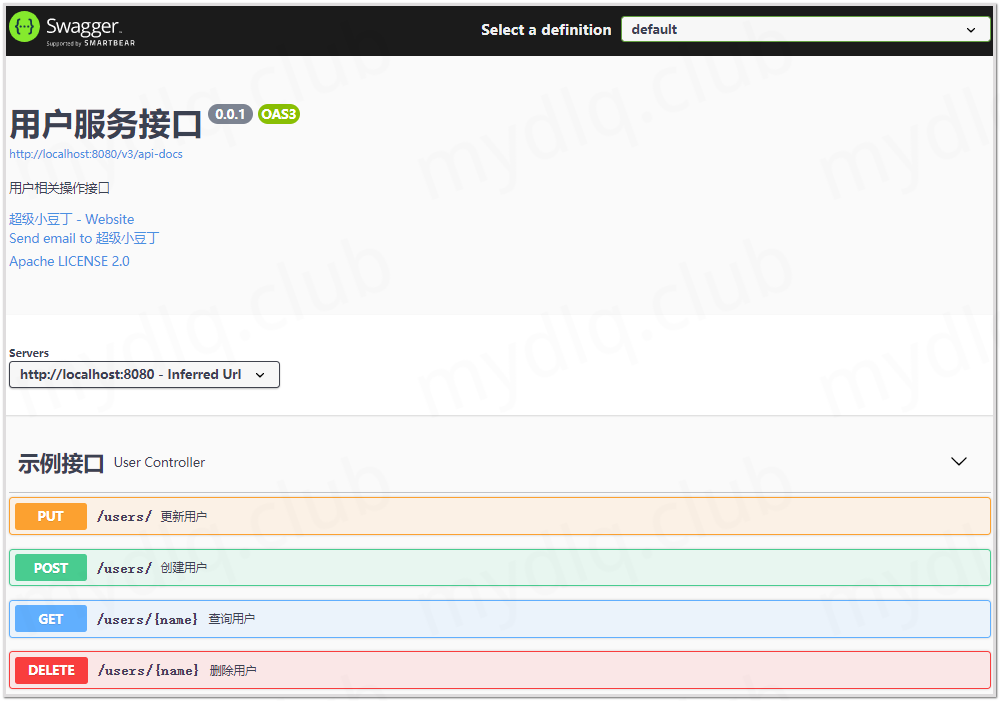
上面的接口文档界面很清晰,我们可以很方便的使用该文档对接口进行调试。
---END---
如果本文对你有帮助,可以关注我的公众号"小豆丁技术栈"了解最新动态,顺便也请帮忙 github 点颗星哦~感谢~

!版权声明:本博客内容均为原创,每篇博文作为知识积累,写博不易,转载请注明出处。