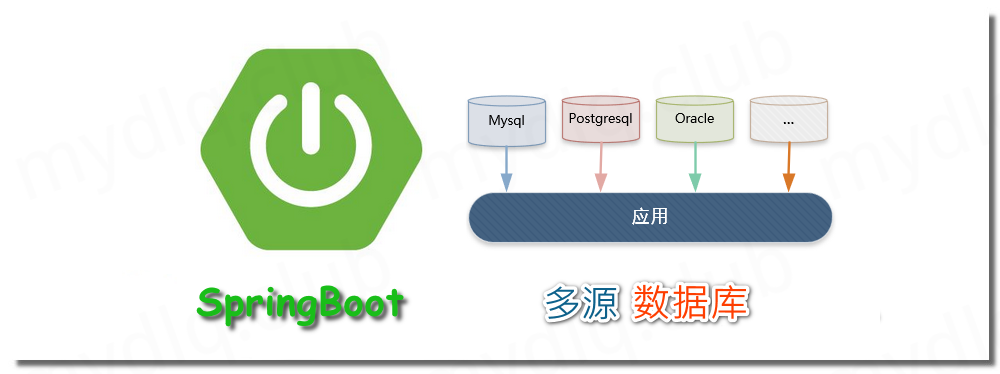
SpringBoot 结合 Mybatis 实现对多源数据库操作
文章目录
!版权声明:本博客内容均为原创,每篇博文作为知识积累,写博不易,转载请注明出处。
系统环境:
- Java Jdk 版本:1.8
- Mysql 版本:8.0.19
- Mybatis 版本:3.5.6
- SpringBoot 版本:2.4.2
- Postgresql 版本:12.5
参考地址:
项目示例地址:
如果本文对你有帮助,请帮忙 github 点颗星哦~
一、为什么需要操作多源数据库
在日常开发中,我们会经常遇见各式各样的需求。比如,一个应用中操作多个数据库,而且数据库可能不是一种类型的数据库,需要从多种数据库中读取数据,这种需求屡见不鲜。
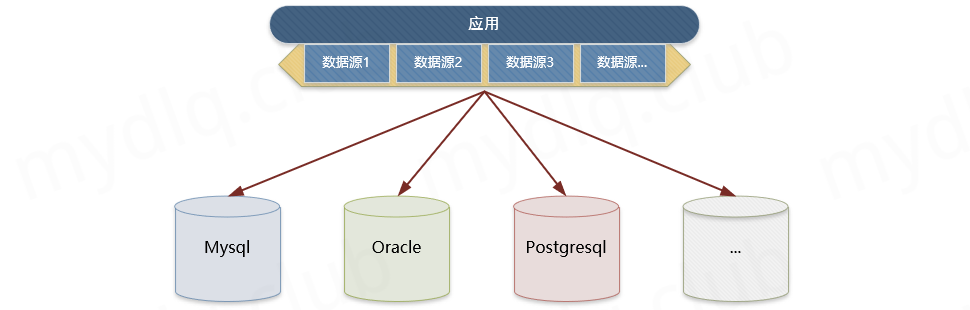
二、如何实现多源数据库
目前使用 SpringBoot 实现多数据库实现方案比较多,这里只列出两种常用方案:
- 方案一:创建多个数据源配置类,在类中配置数据源使用不同的 Datasource,并且指定应用该数据源配置的生效的 Mapper 包路径。这样我们使用中调用不同包中的 Mapper 就会切换到不同的数据库中,执行对应的 SQL 操作。
- 方案二:使用 baomidou 开源的组件 dynamic-datasource 实现多源数据库切换。该组件内部针对多个数据库的配置与操作进行了封装,加上与 SpringBoot 结合实现自动化配置,我们使用中只要在 Service 类上或者 Service 内部方法上添加 @DS 注解,就能轻松实现不同类型的数据库切换。
两种方式都能使 SpringBoot 支持多数据库,不过方案一需要进行很多数据源的配置,相对复杂,不过可以灵活配置。而方案二的组件对数据源相关配置进行了封装,直接可以通过注解方式来切换不同的类型的数据库,非常简单方便。两种方案都有各自的优缺点,使用哪种还需要大家自信斟酌。
三、准备实验的测试环境
在下面我们会写两个示例,分别使用两种方案来实现 SpringBoot + Mybatis 对多源数据库的支持,不过我们需要提前准备演示的数据库及其用例。
准备两种类型的数据库,如下:
- 数据库一:mysql
- 数据库二:postgresql
Mysql 和 Postgresql 中创建数据库 db1 与 db2,命令如下:
- Mysql:
CREATE DATABASE db1; - Postgresql:
CREATE DATABASE db2;
数据库创建完成后需要导入用于实验的表 SQL 文件,如下:
- 数据库一:mysql 实验的表 Sql 文件
- 数据库二:postgresql 实验的表 Sql 文件
两种类型数据库用于实验的表结构,如下:
- 数据库一:t_user_info 表:
| id | name | gender | age |
|---|---|---|---|
| 1 | 小豆丁 | 0 | 22 |
- 数据库二:t_account 表:
| id | username | password | create_time | update_time |
|---|---|---|---|---|
| 1 | mydlq | 123456 | 2021-01-01 00:00:00 | 2021-01-01 00:00:00 |
四、方案一配置数据源使用步骤
使用创建数据库配置类方式来实现多数据源支持,可以进行如下步骤:
1、配置文件添加数据库参数
需要在 SpringBoot 配置文件 application.yml 中,添加如下多个数据库连接配置。
 1datasource:
 2  ## 数据库一
 3  db1:
 4    driverClassName: com.mysql.cj.jdbc.Driver
 5    jdbc-url: jdbc:mysql://127.0.0.1:3306/db1?serverTimezone=Asia/Shanghai&useUnicode=true&characterEncoding=utf-8&useSSL=false
 6    username: root
 7    password: 123456
 8  ## 数据库二
 9  db2:
10    driverClassName: org.postgresql.Driver
11    jdbc-url: jdbc:postgresql://127.0.0.1:5432/db2?currentSchema=public
12    username: postgre
13    password: 123456
2、创建 Mapper 包
提前在项目目录中创建用于存放 Mapper 的包,如下所示中 db1 包中存放数据库一的相关操作接口,db2 包中存放操作数据库二的相关操作接口:
- 数据库一包路径:/src/main/java/mydlq/dao/db1
- 数据库二包路径:/src/main/java/mydlq/dao/db2
提前在项目的 /resources 目录下创建 Mapper 对应的 xml 的目录:
- 数据库一 Mapper 对应的 xml 文件目录:/src/main/resources/mappers/db1
- 数据库二 Mapper 对应的 xml 文件目录:/src/main/resources/mappers/db2
3、创建数据源配置类
这里我们需要创建两个数据源配置类,每个类都对应一个数据源的配置,内容如下:
数据库一配置类 Db1DataSourceConfig
 1@Configuration
 2@MapperScan(basePackages = Db1DataSourceConfig.PACKAGE, sqlSessionFactoryRef = Db1DataSourceConfig.PACKAGE)
 3public class Db1DataSourceConfig {
 4
 5    /** 指定 Sql Session Factory 的 Bean 名称 */
 6    static final String SQL_SESSION_FACTORY = "db1SqlSessionFactory";
 7    /** 指定 Mapper 类的包路径 */
 8    static final String PACKAGE = "mydlq.dao.db1";
 9    /** 指定数据库 Mapper 对应的 xml 文件路径 */
10    static final String MAPPER = "classpath:mappers/db1/*.xml";
11
12    /**
13     * 配置数据源,这里设置为 hikari 数据库连接池
14     * @return DataSource
15     */
16    @Primary
17    @Bean(name = "db1DataSource")
18    @ConfigurationProperties("datasource.db1")
19    public DataSource dataSource() {
20        return DataSourceBuilder.create().type(HikariDataSource.class).build();
21    }
22
23    /**
24     * 数据源事务管理器
25     * @return 数据源事务管理器
26     */
27    @Primary
28    @Bean(name = "db1TransactionManager")
29    public DataSourceTransactionManager dataSourceTransactionManager(@Qualifier("db1DataSource") DataSource dataSource) {
30        return new DataSourceTransactionManager(dataSource);
31    }
32
33    @Primary
34    @Bean(name = SQL_SESSION_FACTORY)
35    public SqlSessionFactory sqlSessionFactory(@Qualifier("db1DataSource") DataSource masterDataSource) throws Exception {
36        final SqlSessionFactoryBean sessionFactory = new SqlSessionFactoryBean();
37        sessionFactory.setDataSource(masterDataSource);
38        sessionFactory.setMapperLocations(new PathMatchingResourcePatternResolver().getResources(Db1DataSourceConfig.MAPPER));
39        return sessionFactory.getObject();
40    }
41
42}
数据库二配置类 Db2DataSourceConfig
 1@Configuration
 2@MapperScan(basePackages = Db2DataSourceConfig.PACKAGE, sqlSessionFactoryRef = Db2DataSourceConfig.PACKAGE)
 3public class Db2DataSourceConfig {
 4
 5    /** 指定 Sql Session Factory 的 Bean 名称 */
 6    static final String SQL_SESSION_FACTORY = "db2SqlSessionFactory";
 7    /** 指定 Mapper 类的包路径 */
 8    static final String PACKAGE = "mydlq.dao.db2";
 9    /** 指定数据库 Mapper 对应的 xml 文件路径 */
10    static final String MAPPER = "classpath:mappers/db2/*.xml";
11
12    /**
13     * 配置数据源,这里设置为 hikari 数据库连接池
14     * @return DataSource
15     */
16    @Primary
17    @Bean(name = "db2DataSource")
18    @ConfigurationProperties("datasource.db2")
19    public DataSource dataSource() {
20        return DataSourceBuilder.create().type(HikariDataSource.class).build();
21    }
22
23    /**
24     * 数据源事务管理器
25     * @return 数据源事务管理器
26     */
27    @Primary
28    @Bean(name = "db2TransactionManager")
29    public DataSourceTransactionManager dataSourceTransactionManager(@Qualifier("db2DataSource") DataSource dataSource) {
30        return new DataSourceTransactionManager(dataSource);
31    }
32
33    @Primary
34    @Bean(name = SQL_SESSION_FACTORY)
35    public SqlSessionFactory sqlSessionFactory(@Qualifier("db2DataSource") DataSource masterDataSource) throws Exception {
36        final SqlSessionFactoryBean sessionFactory = new SqlSessionFactoryBean();
37        sessionFactory.setDataSource(masterDataSource);
38        sessionFactory.setMapperLocations(new PathMatchingResourcePatternResolver().getResources(Db2DataSourceConfig.MAPPER));
39        return sessionFactory.getObject();
40    }
41
42}
我们在使用时,调用:
- mydlq.dao.db1 包的 mapper 接口中的方法就会使用 Db1DataSourceConfig 的配置,切换数据库一读取数据。
- mydlq.dao.db2 包的 mapper 接口中的方法就会使用 Db2DataSourceConfig 的配置,切换数据库二读取数据。
五、方案一示例:配置数据源实现
使用创建数据库配置类方式来实现多数据源支持,这里直接使用上面准备的两种类型的数据库中两个表中的数据,实现一个项目中调用两种数据库进行查询。创建一个测试接口,将查询到的数据拼接在一起进行返回。示例代码如下:
1、Maven 引入相关依赖
Maven 的 pom.xml 文件引入 SpringBoot、Myabtis、Lombok、Mysql 和 Postgresql 相关依赖,内容如下:
 1<?xml version="1.0" encoding="UTF-8"?>
 2<project xmlns="http://maven.apache.org/POM/4.0.0" xmlns:xsi="http://www.w3.org/2001/XMLSchema-instance"
 3         xsi:schemaLocation="http://maven.apache.org/POM/4.0.0 https://maven.apache.org/xsd/maven-4.0.0.xsd">
 4    <modelVersion>4.0.0</modelVersion>
 5
 6    <parent>
 7        <groupId>org.springframework.boot</groupId>
 8        <artifactId>spring-boot-starter-parent</artifactId>
 9        <version>2.4.2</version>
10    </parent>
11
12    <groupId>mydlq.club</groupId>
13    <artifactId>springboot-mybatis-many-database-config</artifactId>
14    <version>0.0.1</version>
15    <name>springboot-mybatis-many-database-config</name>
16    <description>database demo</description>
17
18    <properties>
19        <java.version>1.8</java.version>
20    </properties>
21
22    <dependencies>
23        <!-- SpringBoot Web -->
24        <dependency>
25            <groupId>org.springframework.boot</groupId>
26            <artifactId>spring-boot-starter-web</artifactId>
27        </dependency>
28        <!-- Lombok -->
29        <dependency>
30            <groupId>org.projectlombok</groupId>
31            <artifactId>lombok</artifactId>
32        </dependency>
33        <!-- Mysql -->
34        <dependency>
35            <artifactId>mysql-connector-java</artifactId>
36            <groupId>mysql</groupId>
37        </dependency>
38        <!-- Postgresql -->
39        <dependency>
40            <groupId>org.postgresql</groupId>
41            <artifactId>postgresql</artifactId>
42            <scope>runtime</scope>
43        </dependency>
44        <!-- Mybatis SpringBoot -->
45        <dependency>
46            <groupId>org.mybatis.spring.boot</groupId>
47            <artifactId>mybatis-spring-boot-starter</artifactId>
48            <version>2.1.4</version>
49        </dependency>
50    </dependencies>
51
52    <build>
53        <plugins>
54            <plugin>
55                <groupId>org.springframework.boot</groupId>
56                <artifactId>spring-boot-maven-plugin</artifactId>
57            </plugin>
58        </plugins>
59    </build>
60
61</project>
上面没有配置数据库连接池,由于 SpringBoot 2.x 以后默认引入 Hikari 连接池,性能很好,所以我们使用其默认连接池即可。
2、配置文件中添加相关参数
在 SpringBoot 配置文件 application.yml 中,配置数据库相关配置。由于我们会用到两个数据库,所以这里我们配置两套数据库配置:
- db1:用于连接
mysql数据库的配置。 - db2:用于连接
postgresql数据库的配置。
application.yml 文件内容如下:
 1datasource:
 2  db1:
 3    driverClassName: com.mysql.cj.jdbc.Driver
 4    jdbc-url: jdbc:mysql://127.0.0.1:3306/db1?serverTimezone=Asia/Shanghai&useUnicode=true&characterEncoding=utf-8&useSSL=false
 5    username: root
 6    password: 123456
 7  db2:
 8    driverClassName: org.postgresql.Driver
 9    jdbc-url: jdbc:postgresql://127.0.0.1:5432/db2?currentSchema=public
10    username: postgre
11    password: 123456
3、创建数据库配置类
数据库一配置类: Db1DataSourceConfig
 1import javax.sql.DataSource;
 2import com.zaxxer.hikari.HikariDataSource;
 3import org.apache.ibatis.session.SqlSessionFactory;
 4import org.mybatis.spring.SqlSessionFactoryBean;
 5import org.mybatis.spring.annotation.MapperScan;
 6import org.springframework.beans.factory.annotation.Qualifier;
 7import org.springframework.boot.context.properties.ConfigurationProperties;
 8import org.springframework.boot.jdbc.DataSourceBuilder;
 9import org.springframework.context.annotation.Bean;
10import org.springframework.context.annotation.Configuration;
11import org.springframework.context.annotation.Primary;
12import org.springframework.core.io.support.PathMatchingResourcePatternResolver;
13import org.springframework.jdbc.datasource.DataSourceTransactionManager;
14
15@Configuration
16@MapperScan(basePackages = Db1DataSourceConfig.PACKAGE, sqlSessionFactoryRef = Db1DataSourceConfig.PACKAGE)
17public class Db1DataSourceConfig {
18
19    /** 指定 Sql Session Factory 的 Bean 名称 */
20    static final String SQL_SESSION_FACTORY = "db1SqlSessionFactory";
21    /** 指定 Mapper 类的包路径 */
22    static final String PACKAGE = "mydlq.club.example.dao.db1";
23    /** 指定数据库 Mapper 对应的 xml 文件路径 */
24    static final String MAPPER = "classpath:mappers/db1/*.xml";
25
26    /**
27     * 配置数据源,这里设置为 hikari 数据库连接池
28     * @return DataSource
29     */
30    @Primary
31    @Bean(name = "db1DataSource")
32    @ConfigurationProperties("datasource.db1")
33    public DataSource dataSource() {
34        return DataSourceBuilder.create().type(HikariDataSource.class).build();
35    }
36
37    /**
38     * 数据源事务管理器
39     * @return 数据源事务管理器
40     */
41    @Primary
42    @Bean(name = "db1TransactionManager")
43    public DataSourceTransactionManager dataSourceTransactionManager(@Qualifier("db1DataSource") DataSource dataSource) {
44        return new DataSourceTransactionManager(dataSource);
45    }
46
47    @Primary
48    @Bean(name = SQL_SESSION_FACTORY)
49    public SqlSessionFactory sqlSessionFactory(@Qualifier("db1DataSource") DataSource masterDataSource) throws Exception {
50        final SqlSessionFactoryBean sessionFactory = new SqlSessionFactoryBean();
51        sessionFactory.setDataSource(masterDataSource);
52        sessionFactory.setMapperLocations(new PathMatchingResourcePatternResolver().getResources(Db1DataSourceConfig.MAPPER));
53        return sessionFactory.getObject();
54    }
55
56}
数据库二配置类: Db2DataSourceConfig
 1import javax.sql.DataSource;
 2import com.zaxxer.hikari.HikariDataSource;
 3import org.apache.ibatis.session.SqlSessionFactory;
 4import org.mybatis.spring.SqlSessionFactoryBean;
 5import org.mybatis.spring.annotation.MapperScan;
 6import org.springframework.beans.factory.annotation.Qualifier;
 7import org.springframework.boot.context.properties.ConfigurationProperties;
 8import org.springframework.boot.jdbc.DataSourceBuilder;
 9import org.springframework.context.annotation.Bean;
10import org.springframework.context.annotation.Configuration;
11import org.springframework.core.io.support.PathMatchingResourcePatternResolver;
12import org.springframework.jdbc.datasource.DataSourceTransactionManager;
13
14@Configuration
15@MapperScan(basePackages = Db2DataSourceConfig.PACKAGE, sqlSessionFactoryRef = "db2SqlSessionFactory")
16public class Db2DataSourceConfig {
17
18    /** 指定 Sql Session Factory 的 Bean 名称 */
19    static final String SQL_SESSION_FACTORY = "db2SqlSessionFactory";
20    /** 指定 Mapper 类的包路径 */
21    static final String PACKAGE = "mydlq.club.example.dao.db2";
22    /** 指定数据库 Mapper 对应的 xml 文件路径 */
23    static final String MAPPER = "classpath:mappers/db2/*.xml";
24
25    /**
26     * 配置数据源,设置为 hikari
27     * @return DataSource
28     */
29    @Bean(name = "db2DataSource")
30    @ConfigurationProperties("datasource.db2")
31    public DataSource masterDataSource() {
32        return DataSourceBuilder.create().type(HikariDataSource.class).build();
33    }
34
35    /**
36     * 数据源事务管理器
37     * @return 数据源事务管理器
38     */
39    @Bean(name = "db2TransactionManager")
40    public DataSourceTransactionManager masterTransactionManager() {
41        return new DataSourceTransactionManager(masterDataSource());
42    }
43
44    @Bean(name = SQL_SESSION_FACTORY)
45    public SqlSessionFactory masterSqlSessionFactory(@Qualifier("db2DataSource") DataSource masterDataSource) throws Exception {
46        final SqlSessionFactoryBean sessionFactory = new SqlSessionFactoryBean();
47        sessionFactory.setDataSource(masterDataSource);
48        sessionFactory.setMapperLocations(new PathMatchingResourcePatternResolver().getResources(Db2DataSourceConfig.MAPPER));
49        return sessionFactory.getObject();
50    }
51
52}
注解说明:
- @ConfigurationProperties:从配置文件中读取指定前缀的配置参数。
- @MapperScan:指定数据库配置对哪些包的 Mapper 生效,指定数据库 SQL 会话工厂。
- @Primary:声明这是一个主数据源(默认数据源),多数据源配置时必不可少。
- @Qualifier:显式选择传入的 Bean,根据配置的名称指定使用哪个 Bean。
4、创建实体类
数据库一的实体类: UserInfo
 1import lombok.Data;
 2
 3@Data
 4public class UserInfo {
 5    /** 主键 */
 6    private Integer id;
 7    /** 姓名 */
 8    private String name;
 9    /** 性别(0:男,1:女)*/
10    private String gender;
11    /** 岁数 */
12    private Byte age;
13}
数据库二的实体类: Account
 1import java.time.LocalDateTime;
 2import lombok.Data;
 3
 4@Data
 5public class Account {
 6    /** 主键 */
 7    private Integer id;
 8    /** 用户名 */
 9    private String username;
10    /** 密码 */
11    private String password;
12    /** 创建时间 */
13    private LocalDateTime createTime;
14    /** 更新时间 */
15    private LocalDateTime updateTime;
16}
5、创建操作数据库的 Mapper 类和 Xml 文件
数据库一
创建 Mapper 类 UserInfoMapper
 1import mydlq.club.example.model.db1.UserInfo;
 2import org.apache.ibatis.annotations.Mapper;
 3
 4@Mapper
 5public interface UserInfoMapper {
 6
 7    /**
 8     * 根据主键查找数据
 9     *
10     * @param id 主键ID
11     * @return 数据
12     */
13    UserInfo selectByPrimaryKey(Integer id);
14
15}
位置 /resources/mappers/db1 创建 Mapper 文件 UserInfoMapper.xml
 1<?xml version="1.0" encoding="UTF-8"?>
 2<!DOCTYPE mapper PUBLIC "-//mybatis.org//DTD Mapper 3.0//EN" "http://mybatis.org/dtd/mybatis-3-mapper.dtd">
 3<mapper namespace="mydlq.club.example.dao.db1.UserInfoMapper">
 4
 5  <resultMap id="BaseResultMap" type="mydlq.club.example.model.db1.UserInfo">
 6    <id column="id" jdbcType="INTEGER" property="id" />
 7    <result column="name" jdbcType="VARCHAR" property="name" />
 8    <result column="gender" jdbcType="VARCHAR" property="gender" />
 9    <result column="age" jdbcType="TINYINT" property="age" />
10  </resultMap>
11
12  <select id="selectByPrimaryKey" parameterType="java.lang.Integer" resultMap="BaseResultMap">
13    SELECT id, `name`, gender, age
14    FROM t_user_info
15    WHERE id = #{id,jdbcType=INTEGER}
16  </select>
17
18</mapper>
数据库二
创建 Mapper 类 AccountMapper
 1import mydlq.club.example.model.db2.Account;
 2import org.apache.ibatis.annotations.Mapper;
 3
 4@Mapper
 5public interface AccountMapper {
 6    /**
 7     * 根据主键查找数据
 8     *
 9     * @param id 主键ID
10     * @return 数据
11     */
12    Account selectByPrimaryKey(Integer id);
13
14}
位置 /resources/mappers/db2 创建 Mapper 文件 AccountMapper.xml
 1<?xml version="1.0" encoding="UTF-8"?>
 2<!DOCTYPE mapper PUBLIC "-//mybatis.org//DTD Mapper 3.0//EN" "http://mybatis.org/dtd/mybatis-3-mapper.dtd">
 3<mapper namespace="mydlq.club.example.dao.db2.AccountMapper">
 4
 5  <resultMap id="BaseResultMap" type="mydlq.club.example.model.db2.Account">
 6    <id column="id" jdbcType="BIGINT" property="id" />
 7    <result column="username" jdbcType="VARCHAR" property="username" />
 8    <result column="password" jdbcType="VARCHAR" property="password" />
 9    <result column="create_time" jdbcType="TIMESTAMP" property="createTime" />
10    <result column="update_time" jdbcType="TIMESTAMP" property="updateTime" />
11  </resultMap>
12
13  <select id="selectByPrimaryKey" parameterType="java.lang.Integer" resultMap="BaseResultMap">
14    SELECT id, username, "password", create_time, update_time
15    FROM t_account
16    WHERE id = #{id,jdbcType=INTEGER}
17  </select>
18
19</mapper>
6、创建测试的 Service 类
创建测试的 Service 类,类中创建 findUserInfo() 和 findAccount() 两个方法,分别通过 AccountMapper 和 UserInfoMapper 访问 Mysql 和 Postgresql 两个数据库获取数据。
 1import mydlq.club.example.dao.db1.UserInfoMapper;
 2import mydlq.club.example.dao.db2.AccountMapper;
 3import mydlq.club.example.model.db1.UserInfo;
 4import mydlq.club.example.model.db2.Account;
 5import org.springframework.beans.factory.annotation.Autowired;
 6import org.springframework.stereotype.Service;
 7
 8@Service
 9public class TestService {
10
11    @Autowired
12    private AccountMapper accountMapper;
13    @Autowired
14    private UserInfoMapper userInfoMapper;
15
16    /**
17     * 数据库一,查询用户信息
18     * @param id 主键ID
19     * @return 用户信息
20     */
21    public UserInfo findUserInfo(Integer id){
22        return userInfoMapper.selectByPrimaryKey(id);
23    }
24
25    /**
26     * 数据库二,查询账户数据
27     * @param id 主键ID
28     * @return 账户数据
29     */
30    public Account findAccount(Integer id){
31        return accountMapper.selectByPrimaryKey(id);
32    }
33
34}
7、创建测试的 Controller 类
创建测试用的 Controller 类,里面调用上面创建的 Service 类中查询两个数据库数据的方法 findUserInfo() 和 findAccount() 来获取两个库中的数据,并提供测试访问的接口 /test,方便后续进行测试。
 1import mydlq.club.example.model.AccountUserInfo;
 2import mydlq.club.example.model.db1.UserInfo;
 3import mydlq.club.example.model.db2.Account;
 4import mydlq.club.example.service.TestService;
 5import org.springframework.beans.factory.annotation.Autowired;
 6import org.springframework.web.bind.annotation.GetMapping;
 7import org.springframework.web.bind.annotation.RestController;
 8
 9@RestController
10public class TestController {
11
12    @Autowired
13    private TestService testService;
14
15    /**
16     * 同时查询两个库的数据
17     * @return 查询结果
18     */
19    @GetMapping("/test")
20    public Object hello1() {
21        // 查询账户数据
22        Account account = testService.findAccount(1);
23        // 查询用户信息
24        UserInfo userInfo = testService.findUserInfo(1);
25        // 创建响应对象
26        AccountUserInfo accountUserInfo = new AccountUserInfo();
27        accountUserInfo.setAccount(account);
28        accountUserInfo.setUserInfo(userInfo);
29        return accountUserInfo;
30    }
31
32}
8、创建 SpringBoot 启动类
创建 SpringBoot 启动类:
 1import org.springframework.boot.SpringApplication;
 2import org.springframework.boot.autoconfigure.SpringBootApplication;
 3
 4@SpringBootApplication
 5public class Application {
 6
 7    public static void main(String[] args) {
 8        SpringApplication.run(Application.class, args);
 9    }
10
11}
9、访问接口进行测试
输入地址:http://localhost:8080/test 测试是否能够从"mysql"和"postgresql"两个数据库中获取数据,结果如下:
 1{
 2    "userInfo": {
 3        "id": 1,
 4        "name": "小豆丁",
 5        "gender": "0",
 6        "age": 22
 7    },
 8    "account": {
 9        "id": 1,
10        "username": "mydlq",
11        "password": "123456",
12        "createTime": "2021-01-01T00:00:00",
13        "updateTime": "2021-01-01T00:00:00"
14    }
15}
根据上面测试结果可知,按上面配置确实能够实现从不同类型的数据库中读取数据,不过这种方法需要对创建多个数据源配置类才能适配多个数据库,实际使用起来还是比较繁琐的。下面将会演示如何使用 dynamic-datasource 提供的注解方式来实现多源数据库。
六、方案二使用数据库切换组件步骤
使用 dynamic-datasource 来支持多源数据库要简单的多,这里简单介绍下它的使用,如果想详细了解可以访问其官方文档,里面有详细的介绍如何使用该插件。
dynamic-datasource 官方文档地址:https://dynamic-datasource.com/
1、Maven 引入 dynamic-datasource 依赖
Maven 中引入 dynamic-datasource-spring-boot-starter 依赖:
1<dependency>
2    <groupId>com.baomidou</groupId>
3    <artifactId>dynamic-datasource-spring-boot-starter</artifactId>
4    <version>3.3.1</version>
5</dependency>
2、配置文件添加数据库参数
需要在 SpringBoot 配置文件 application.yml 中添加多数据源的数据库连接配置。
 1spring:
 2  datasource:
 3    dynamic:
 4      primary: db1  #设置默认的数据源或者数据源组,默认值即为 master
 5      strict: false #设置严格模式,默认false不启动. 启动后在未匹配到指定数据源时候会抛出异常,不启动则使用默认数据源。
 6      datasource:
 7        db1:
 8          url: jdbc:mysql://127.0.0.1:3306/db1?serverTimezone=Asia/Shanghai&useUnicode=true&characterEncoding=utf-8&useSSL=false
 9          username: root
10          password: 123456
11          driver-class-name: com.mysql.cj.jdbc.Driver
12        db2:
13          url: jdbc:postgresql://127.0.0.1:5432/db2?currentSchema=public
14          username: postgre
15          password: 123456
16          driver-class-name: org.postgresql.Driver
17
18## 配置 mapper 对应的 xml 文件目录
19mybatis:
20  mapper-locations: classpath:mappers/db1/*.xml,classpath*:/mappers/db2/*.xml
3、Service 类或者方法添加 @DS 注解
在 Service 类或者类中方法上添加 @DS 注解来标识使用哪个数据库。
 1@DS("db1")  //默认使用数据库1
 2@Service
 3public class TestService {
 4
 5    /**
 6     * 切换到数据库一读取数据
 7     */
 8    @DS("db1")
 9    public UserInfo findUserInfo(Integer id){
10        ...
11    }
12
13    /**
14     * 切换到数据库二读取数据
15     */
16    @DS("db2")
17    public Account findAccount(Integer id){
18        ...
19    }
20
21}
注解 @DS 可以配置在类或者方法上,同时存在就近原则,方法上注解优先于类上注解。上面类和方法上都加了 @DS 注解,如果类中方法上添加 @DS 注解,那则在调用数据库 Dao 方法时,使用以类上面的 @DS 注解中指定的数据库。如果方法上面添加了该注解,则使用注解中指定的数据库。当然,如果类和方法上都没有加注解的话,那么将会使用配置文件中 spring.datasource.dynamic.primary 指定的默认数据库。
注意:该组件实现方式是通过 Spring 的 AOP 进行数据源处理的,所以方法调用同一个类中的其它方法是不生效的(会使用配置的默认数据库),必须通过引入操作数据库的 Bean 来调用切换数据库的方法才能正常使用。
七、方案二示例:使用数据库切换组件实现
示例项目地址:SpringBoot + Mybatis 通过使用 dynamic-datasource 实现多源数据库示例
使用组件 dynamic-datasource 来实现多数据源支持,这里直接读取上面准备的两种类型的数据库中两个表中的数据,实现一个项目中调用两种数据库进行查询。创建一个测试接口,将查询到的数据拼接在一起进行返回。示例代码如下:
1、Maven 引入相关依赖
Maven 的 pom.xml 文件引入 SpringBoot、Myabtis、Lombok、dynamic-datasource、Mysql 和 Postgresql 相关依赖,内容如下:
 1<?xml version="1.0" encoding="UTF-8"?>
 2<project xmlns="http://maven.apache.org/POM/4.0.0" xmlns:xsi="http://www.w3.org/2001/XMLSchema-instance"
 3         xsi:schemaLocation="http://maven.apache.org/POM/4.0.0 https://maven.apache.org/xsd/maven-4.0.0.xsd">
 4    <modelVersion>4.0.0</modelVersion>
 5
 6    <parent>
 7        <groupId>org.springframework.boot</groupId>
 8        <artifactId>spring-boot-starter-parent</artifactId>
 9        <version>2.4.1</version>
10    </parent>
11
12    <groupId>mydlq.club</groupId>
13    <artifactId>springboot-mybatis-many-database-dynamic</artifactId>
14    <version>0.0.1</version>
15    <name>springboot-mybatis-many-database-dynamic</name>
16    <description>database demo</description>
17
18    <properties>
19        <java.version>1.8</java.version>
20    </properties>
21
22    <dependencies>
23        <!-- SpringBoot Web -->
24        <dependency>
25            <groupId>org.springframework.boot</groupId>
26            <artifactId>spring-boot-starter-web</artifactId>
27        </dependency>
28        <!-- Lombok -->
29        <dependency>
30            <groupId>org.projectlombok</groupId>
31            <artifactId>lombok</artifactId>
32        </dependency>
33        <!-- Mysql -->
34        <dependency>
35            <artifactId>mysql-connector-java</artifactId>
36            <groupId>mysql</groupId>
37        </dependency>
38        <!-- Postgresql -->
39        <dependency>
40            <groupId>org.postgresql</groupId>
41            <artifactId>postgresql</artifactId>
42            <scope>runtime</scope>
43        </dependency>
44        <!-- Mybatis SpringBoot -->
45        <dependency>
46            <groupId>org.mybatis.spring.boot</groupId>
47            <artifactId>mybatis-spring-boot-starter</artifactId>
48            <version>2.1.4</version>
49        </dependency>
50        <!-- Dynamic Datasource -->
51        <dependency>
52            <groupId>com.baomidou</groupId>
53            <artifactId>dynamic-datasource-spring-boot-starter</artifactId>
54            <version>3.3.1</version>
55        </dependency>
56    </dependencies>
57
58    <build>
59        <plugins>
60            <plugin>
61                <groupId>org.springframework.boot</groupId>
62                <artifactId>spring-boot-maven-plugin</artifactId>
63            </plugin>
64        </plugins>
65    </build>
66
67</project>
上面没有配置数据库连接池,由于 SpringBoot 2.x 以后默认引入 Hikari 连接池,性能很好,所以我们使用其默认连接池即可。
2、配置文件中添加相关参数
在 SpringBoot 配置文件 application.yml 中,配置数据库相关配置。由于我们会用到两个数据库,所以这里我们配置两套数据库配置:
- db1:用于连接
mysql数据库的配置。 - db2:用于连接
postgresql数据库的配置。
application.yml 文件内容如下:
 1spring:
 2  datasource:
 3    dynamic:
 4      primary: db1 #设置默认的数据源或者数据源组,默认值即为master
 5      strict: false #设置严格模式,默认false不启动. 启动后在未匹配到指定数据源时候会抛出异常,不启动则使用默认数据源。
 6      datasource:
 7        db1:
 8          url: jdbc:mysql://192.168.2.31:30336/db1?serverTimezone=Asia/Shanghai&useUnicode=true&characterEncoding=utf-8&useSSL=false
 9          username: root
10          password: 123456
11          driver-class-name: com.mysql.cj.jdbc.Driver
12        db2:
13          url: jdbc:postgresql://192.168.2.31:30432/db2?currentSchema=public
14          username: postgre
15          password: 123456
16          driver-class-name: org.postgresql.Driver
17
18## 指定 Mapper 对应的 xml 文件目录地址
19mybatis:
20  mapper-locations: classpath:mappers/db1/*.xml,classpath*:/mappers/db2/*.xml
3、创建实体类
数据库1的实体类: UserInfo
 1import lombok.Data;
 2
 3@Data
 4public class UserInfo {
 5    /** 主键 */
 6    private Integer id;
 7    /** 姓名 */
 8    private String name;
 9    /** 性别(0:男,1:女)*/
10    private String gender;
11    /** 岁数 */
12    private Byte age;
13}
数据库2的实体类: Account
 1import java.time.LocalDateTime;
 2import lombok.Data;
 3
 4@Data
 5public class Account {
 6    /** 主键 */
 7    private Integer id;
 8    /** 用户名 */
 9    private String username;
10    /** 密码 */
11    private String password;
12    /** 创建时间 */
13    private LocalDateTime createTime;
14    /** 更新时间 */
15    private LocalDateTime updateTime;
16}
4、创建操作数据库的 Mapper 类和 Xml 文件
数据库1
创建 Mapper 类 UserInfoMapper
 1import mydlq.club.example.model.db1.UserInfo;
 2import org.apache.ibatis.annotations.Mapper;
 3
 4@Mapper
 5public interface UserInfoMapper {
 6
 7    /**
 8     * 根据主键查找数据
 9     *
10     * @param id 主键ID
11     * @return 数据
12     */
13    UserInfo selectByPrimaryKey(Integer id);
14
15}
位置 /resources/mappers/db1 创建 Mapper 文件 UserInfoMapper.xml
 1<?xml version="1.0" encoding="UTF-8"?>
 2<!DOCTYPE mapper PUBLIC "-//mybatis.org//DTD Mapper 3.0//EN" "http://mybatis.org/dtd/mybatis-3-mapper.dtd">
 3<mapper namespace="mydlq.club.example.dao.db1.UserInfoMapper">
 4
 5  <resultMap id="BaseResultMap" type="mydlq.club.example.model.db1.UserInfo">
 6    <id column="id" jdbcType="INTEGER" property="id" />
 7    <result column="name" jdbcType="VARCHAR" property="name" />
 8    <result column="gender" jdbcType="VARCHAR" property="gender" />
 9    <result column="age" jdbcType="TINYINT" property="age" />
10  </resultMap>
11
12  <select id="selectByPrimaryKey" parameterType="java.lang.Integer" resultMap="BaseResultMap">
13    SELECT id, `name`, gender, age
14    FROM t_user_info
15    WHERE id = #{id,jdbcType=INTEGER}
16  </select>
17
18</mapper>
数据库2
创建 Mapper 类 AccountMapper
 1import mydlq.club.example.model.db2.Account;
 2import org.apache.ibatis.annotations.Mapper;
 3
 4@Mapper
 5public interface AccountMapper {
 6    /**
 7     * 根据主键查找数据
 8     *
 9     * @param id 主键ID
10     * @return 数据
11     */
12    Account selectByPrimaryKey(Integer id);
13
14}
位置 /resources/mappers/db2 创建 Mapper 文件 AccountMapper.xml
 1<?xml version="1.0" encoding="UTF-8"?>
 2<!DOCTYPE mapper PUBLIC "-//mybatis.org//DTD Mapper 3.0//EN" "http://mybatis.org/dtd/mybatis-3-mapper.dtd">
 3<mapper namespace="mydlq.club.example.dao.db2.AccountMapper">
 4
 5  <resultMap id="BaseResultMap" type="mydlq.club.example.model.db2.Account">
 6    <id column="id" jdbcType="BIGINT" property="id" />
 7    <result column="username" jdbcType="VARCHAR" property="username" />
 8    <result column="password" jdbcType="VARCHAR" property="password" />
 9    <result column="create_time" jdbcType="TIMESTAMP" property="createTime" />
10    <result column="update_time" jdbcType="TIMESTAMP" property="updateTime" />
11  </resultMap>
12
13  <select id="selectByPrimaryKey" parameterType="java.lang.Integer" resultMap="BaseResultMap">
14    SELECT id, username, "password", create_time, update_time
15    FROM t_account
16    WHERE id = #{id,jdbcType=INTEGER}
17  </select>
18
19</mapper>
5、创建测试的 Service 类
创建测试的 Service 类,类中创建 findUserInfo() 和 findAccount() 两个方法,并且:
- 在
findUserInfo()方法上加上@DS("db1")注解,表示调用方法时切换数据库一获取数据。 - 在
findAccount()方法上加上@DS("db2")注解,表示调用方法时切换数据库二获取数据。
这样我们使用 findUserInfo() 和 findAccount() 方法时就会从不同的数据库中获取数据。
 1import com.baomidou.dynamic.datasource.annotation.DS;
 2import mydlq.club.example.dao.db1.UserInfoMapper;
 3import mydlq.club.example.dao.db2.AccountMapper;
 4import mydlq.club.example.model.db1.UserInfo;
 5import mydlq.club.example.model.db2.Account;
 6import org.springframework.beans.factory.annotation.Autowired;
 7import org.springframework.stereotype.Service;
 8
 9@Service
10public class TestService {
11
12    @Autowired
13    private AccountMapper accountMapper;
14    @Autowired
15    private UserInfoMapper userInfoMapper;
16
17    /**
18     * 通过 @DS 注解指定使用 DB1 数据库,查询用户信息
19     * @param id 主键ID
20     * @return 用户信息
21     */
22    @DS("db1")
23    public UserInfo findUserInfo(Integer id){
24        return userInfoMapper.selectByPrimaryKey(id);
25    }
26
27    /**
28     * 通过 @DS 注解指定使用 DB2 数据库,查询账户数据
29     * @param id 主键ID
30     * @return 账户数据
31     */
32    @DS("db2")
33    public Account findAccount(Integer id){
34        return accountMapper.selectByPrimaryKey(id);
35    }
36
37}
7、创建测试的 Controller 类
创建测试用的 Controller 类,里面调用上面创建的 Service 类中查询两个数据库数据的方法 findUserInfo() 和 findAccount() 来获取两个库中的数据,并提供测试访问的接口 /test,方便后续进行测试。
 1import mydlq.club.example.model.AccountUserInfo;
 2import mydlq.club.example.model.db1.UserInfo;
 3import mydlq.club.example.model.db2.Account;
 4import mydlq.club.example.service.TestService;
 5import org.springframework.beans.factory.annotation.Autowired;
 6import org.springframework.web.bind.annotation.GetMapping;
 7import org.springframework.web.bind.annotation.RestController;
 8
 9@RestController
10public class TestController {
11
12    @Autowired
13    private TestService testService;
14
15    /**
16     * 同时查询两个库的数据
17     * @return 查询结果
18     */
19    @GetMapping("/test")
20    public Object hello1() {
21        // 查询账户数据
22        Account account = testService.findAccount(1);
23        // 查询用户信息
24        UserInfo userInfo = testService.findUserInfo(1);
25        // 创建响应对象
26        AccountUserInfo accountUserInfo = new AccountUserInfo();
27        accountUserInfo.setAccount(account);
28        accountUserInfo.setUserInfo(userInfo);
29        return accountUserInfo;
30    }
31
32}
8、创建 SpringBoot 启动类
创建 SpringBoot 启动类:
 1import org.springframework.boot.SpringApplication;
 2import org.springframework.boot.autoconfigure.SpringBootApplication;
 3
 4@SpringBootApplication
 5public class Application {
 6
 7    public static void main(String[] args) {
 8        SpringApplication.run(Application.class, args);
 9    }
10
11}
9、访问接口进行测试
输入地址:http://localhost:8080/test 测试是否能够从"mysql"和"postgresql"两个数据库中获取数据,结果如下:
 1{
 2    "userInfo": {
 3        "id": 1,
 4        "name": "小豆丁",
 5        "gender": "0",
 6        "age": 22
 7    },
 8    "account": {
 9        "id": 1,
10        "username": "mydlq",
11        "password": "123456",
12        "createTime": "2021-01-01T00:00:00",
13        "updateTime": "2021-01-01T00:00:00"
14    }
15}
根据上面测试结果可知,使用 dynamic-datasource 实现多源数据库是非常方便的,能够正常从两个不同类型的数据库中读取数据,并且使用插件的注解方式要比使用配置数据源方式简单的多。
八、使用多源数据库切换注意事项
使用时虽然能对多个数据库操作,不过设计到事务时,例如使用 Spring 的 @Transactional 注解添加到事务的方法上,如果方法中只操作一个数据库是可以正常执行事务的。如果操作多个数据库,事务是无法正常执行的。如果想对多个数据库进行事务,需要使用分布式事务来解决该问题。
如果本文对你有帮助,请帮忙 github 点颗星哦~
---END---

!版权声明:本博客内容均为原创,每篇博文作为知识积累,写博不易,转载请注明出处。